Gluten Free Red Velvet Cake
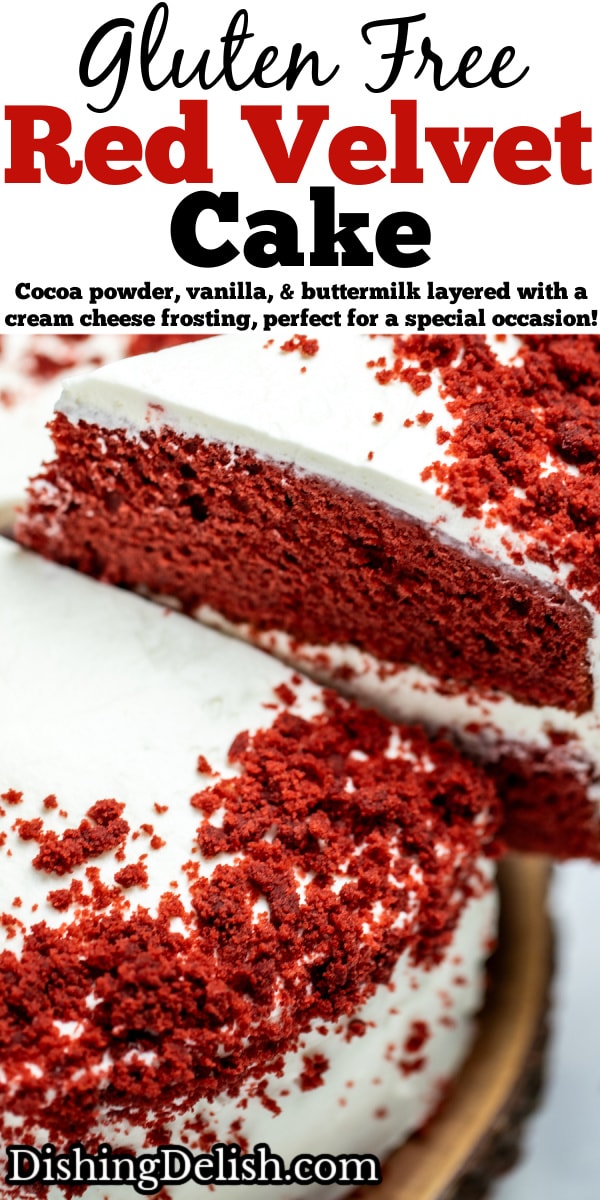
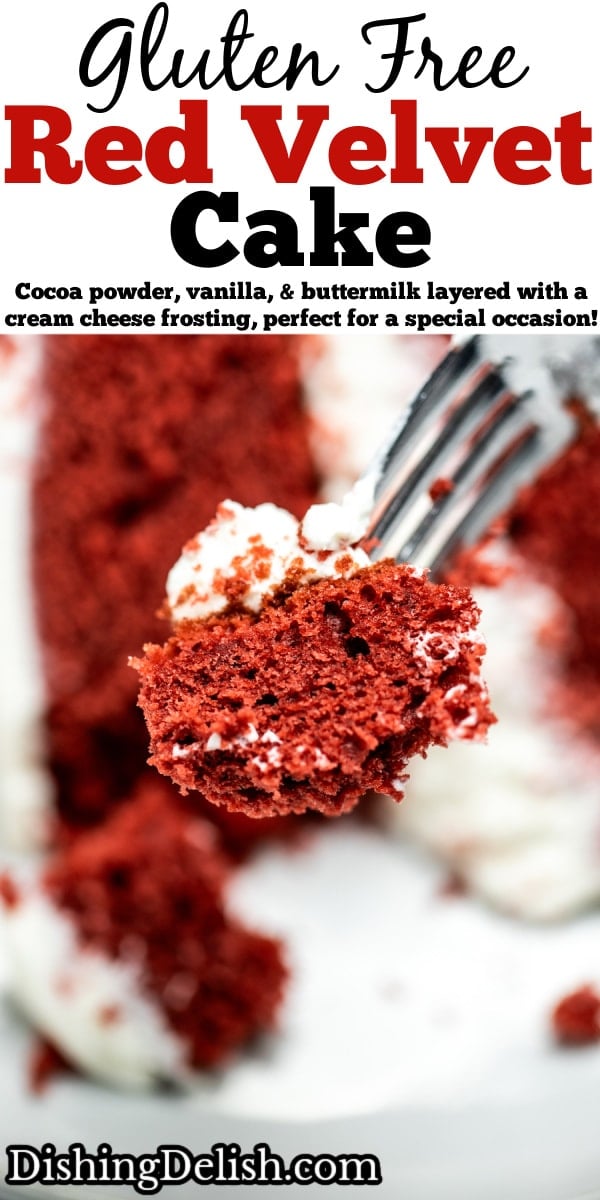
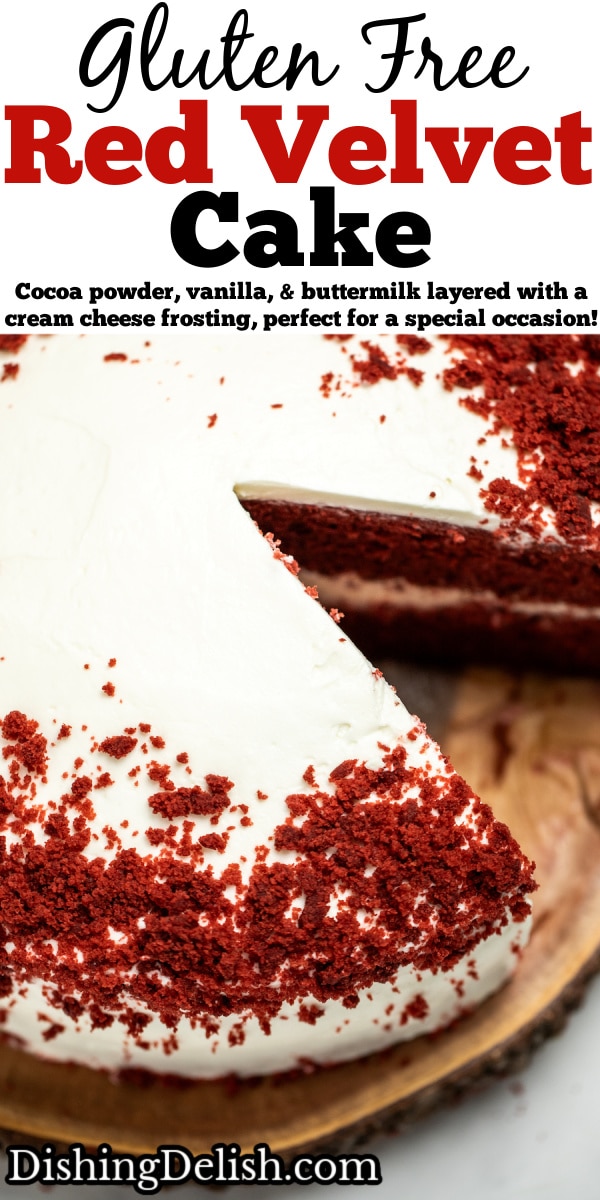
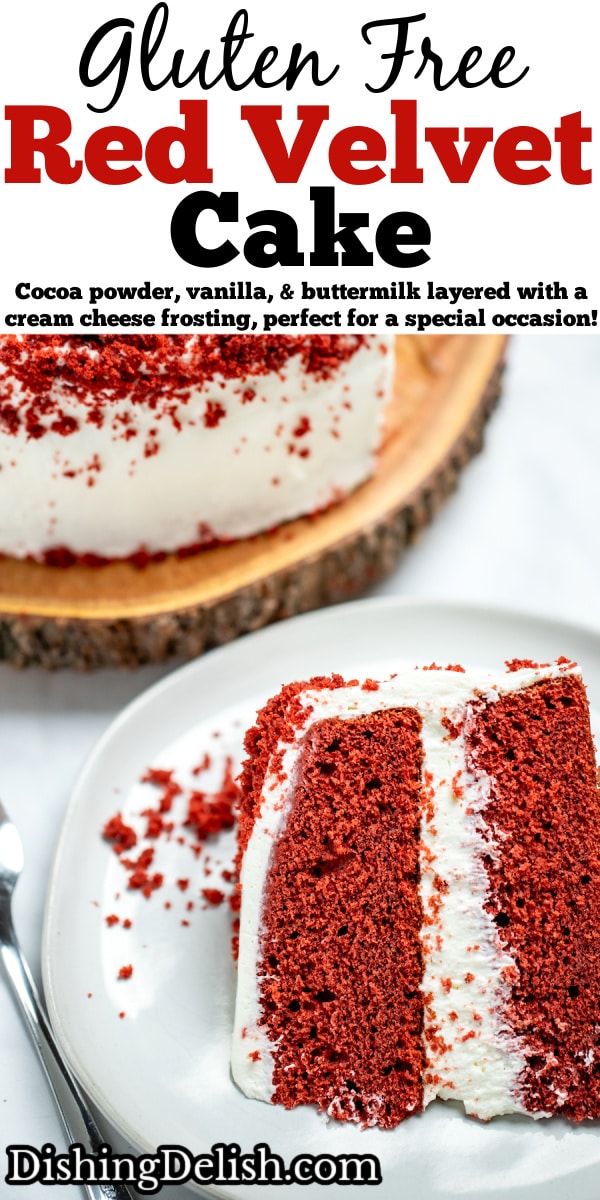
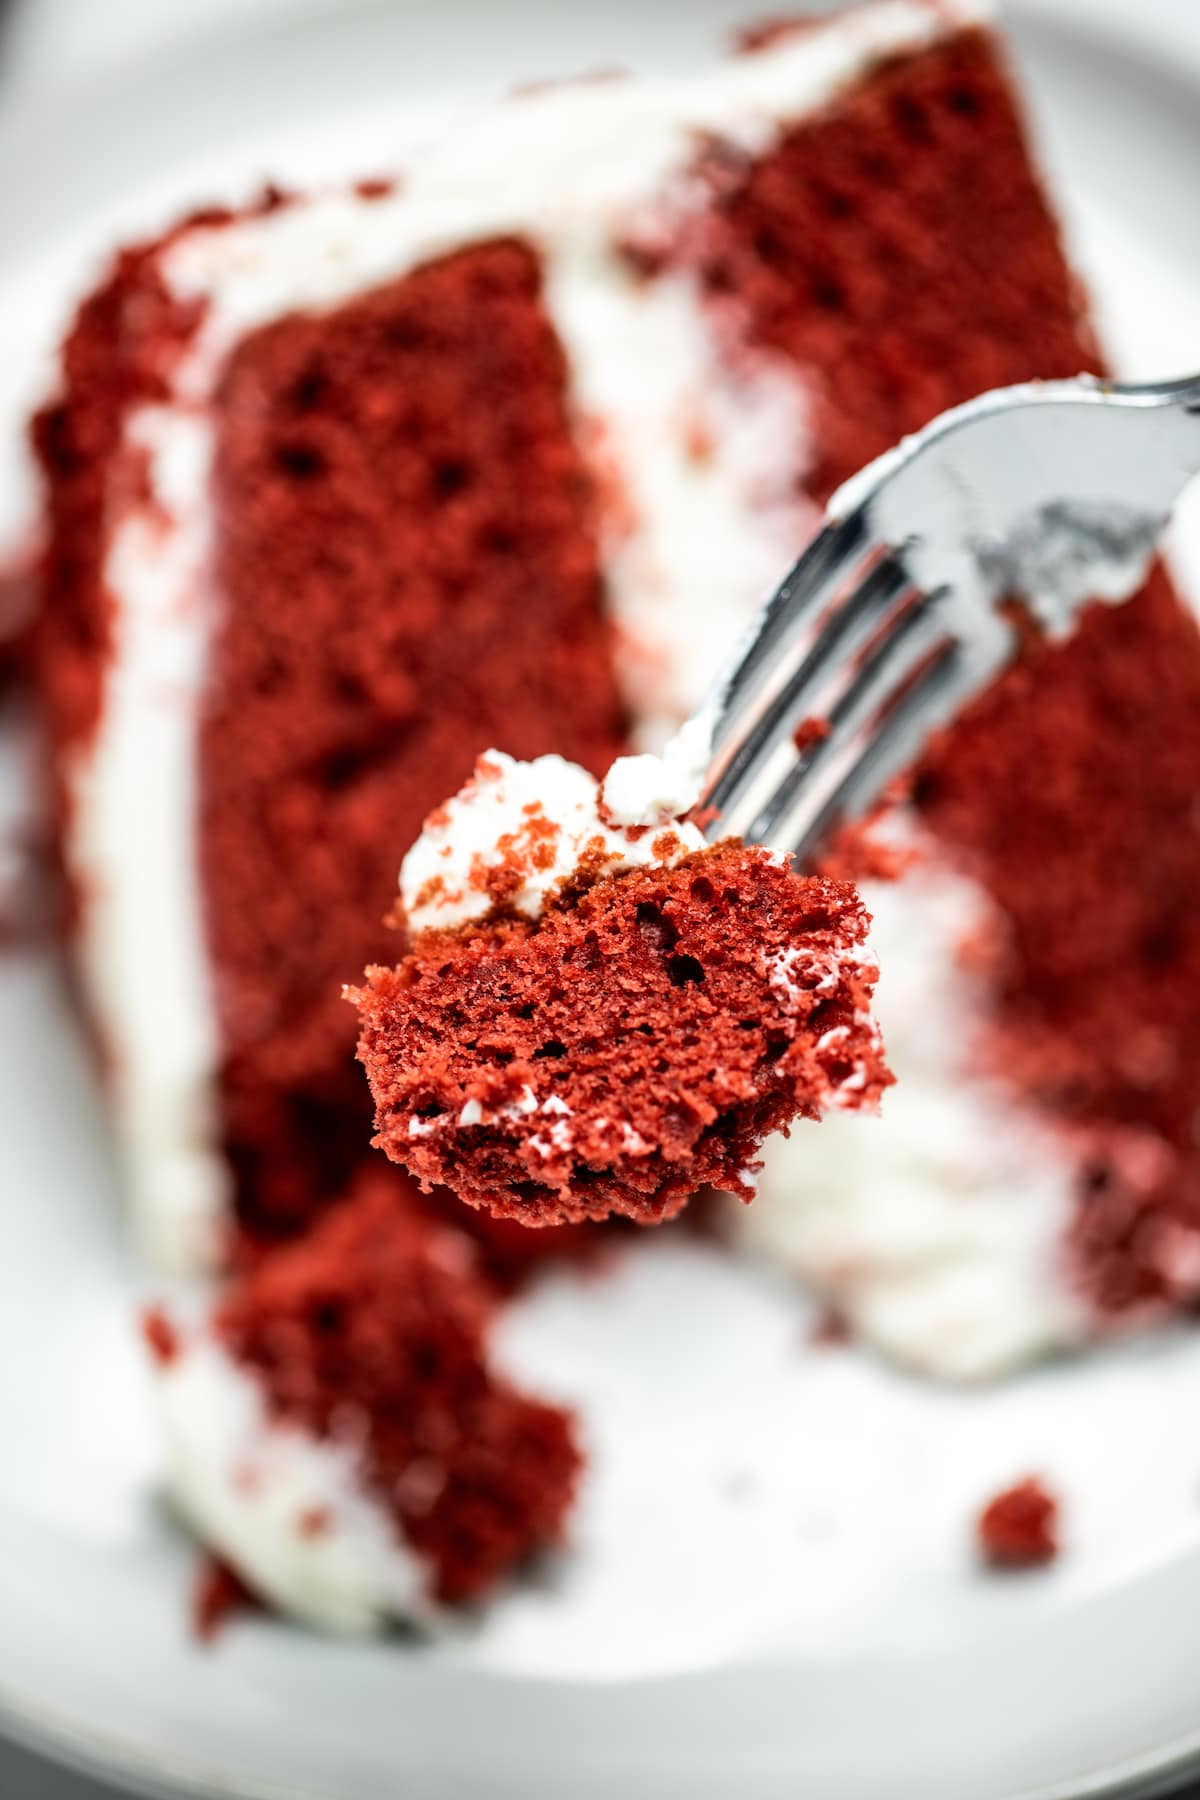
Gluten Free Red Velvet Cake is rich and moist, made with cocoa powder, vanilla, and tangy buttermilk layered with a sweet whipped cream cheese frosting, perfect for a special occasion!
There is definitely a cake for every occasion! For more gluten free baking recipes, check out this Strawberry Chocolate Cake and Chocolate Coffee Cake!
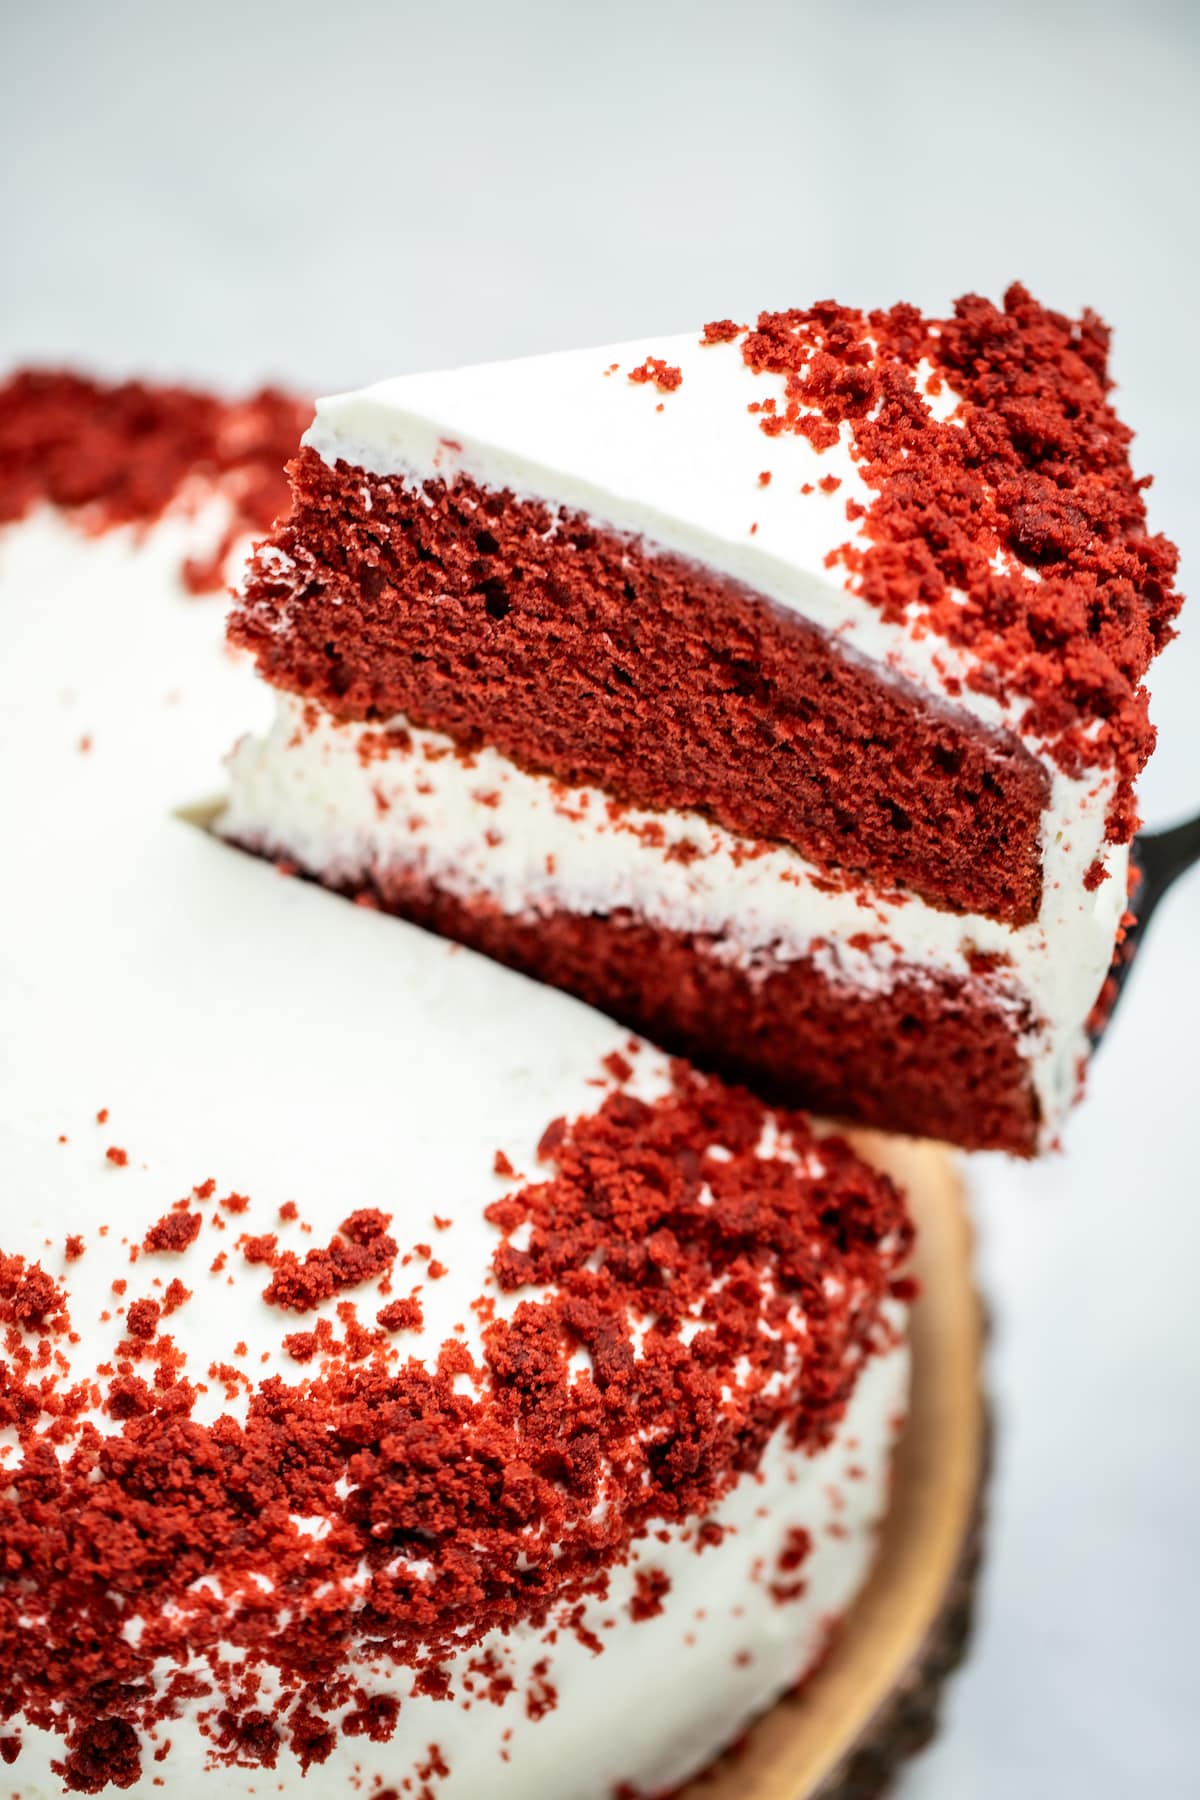
Gluten Free Red Velvet Cake is a sweet mixture of rich chocolate and tangy buttermilk, with moist and tender crumbs and cream cheese frosting. It’s the perfect combination of flavors!
This type of cake is usually paired with a traditional cream cheese frosting, but I like the lighter texture of whipped cream cream cheese frosting. It uses a combination of heavy cream and cream cheese, and tastes like a light and fluffy cheesecake batter! Plus, you can save any leftover frosting in an airtight container to pair with strawberries later on.
Ingredients You’ll Need
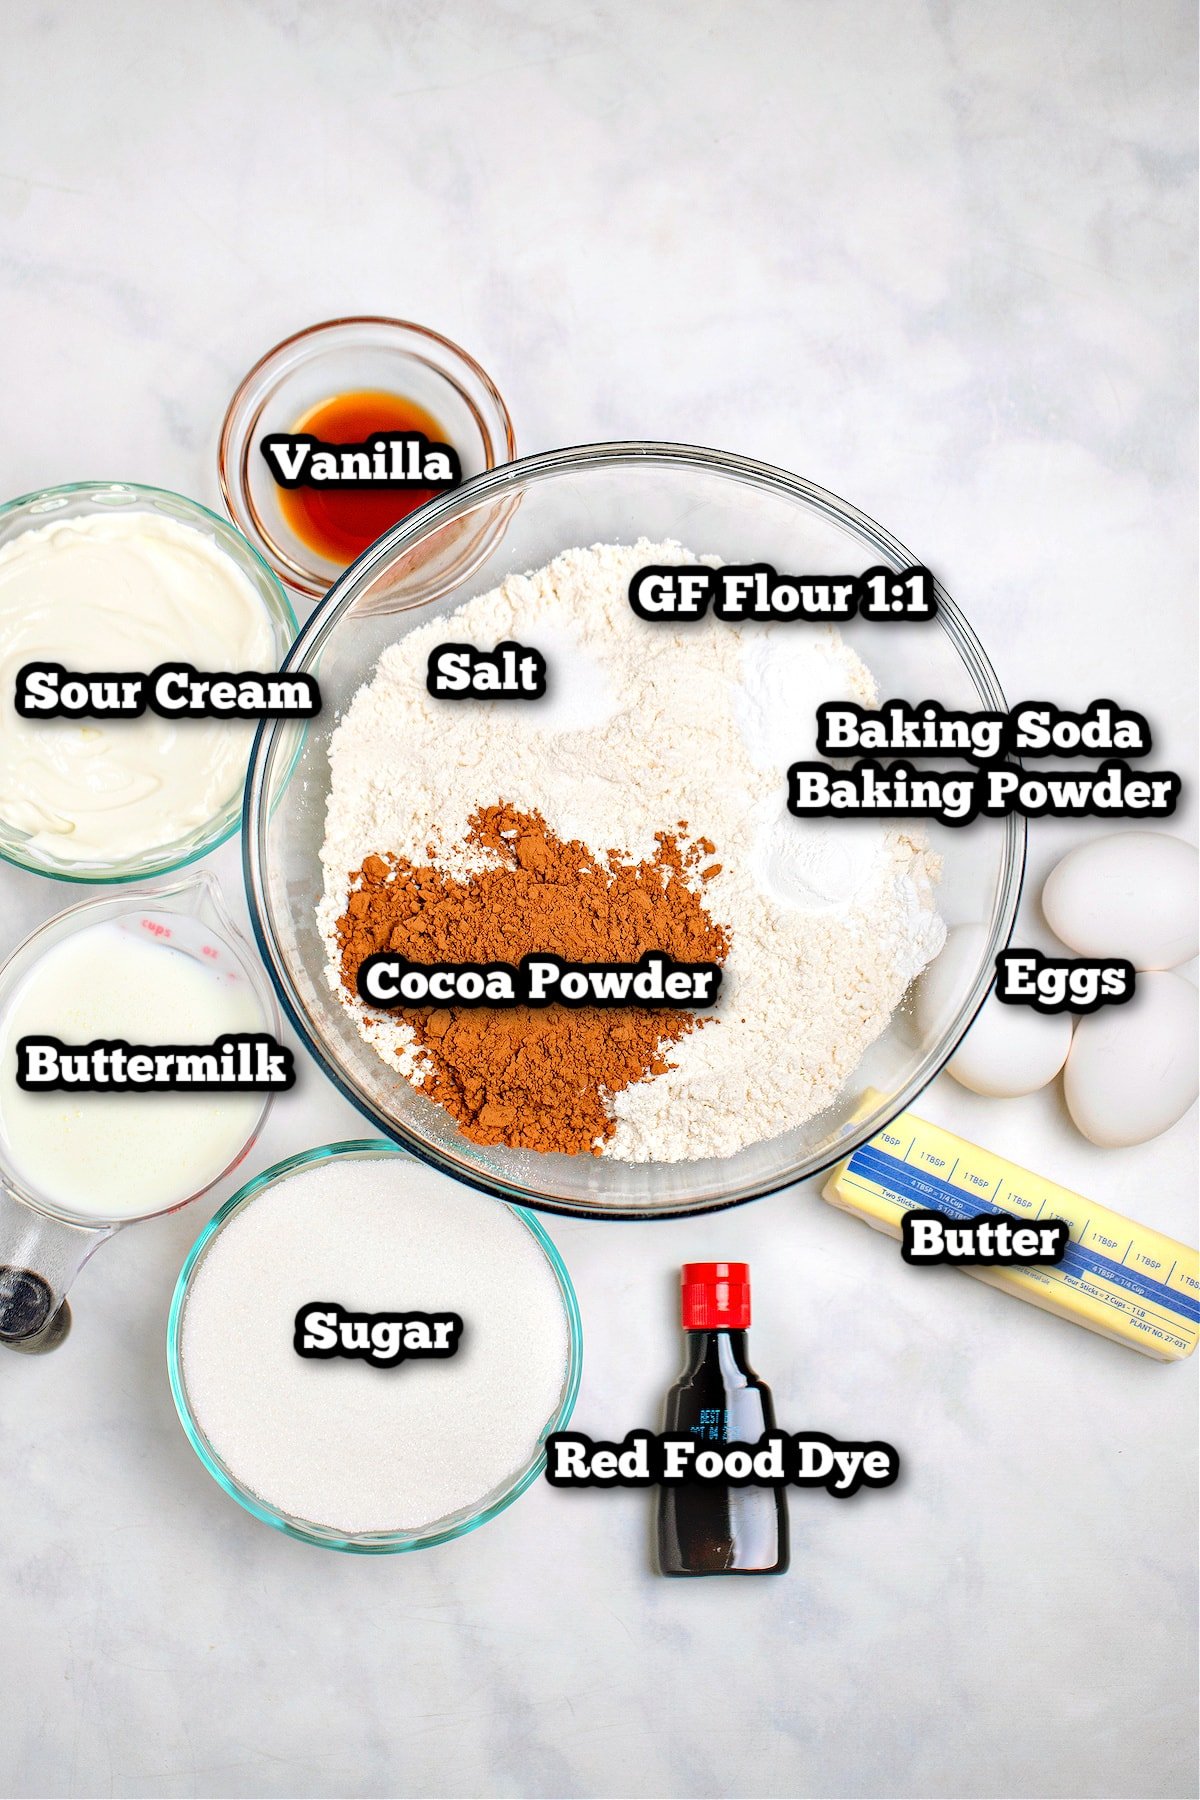
Gluten Free Flour. The flour mixture you choose can have a big impact on how your cake turns out! Gluten free flour blends have to be the right balance of starch and protein. I like to use a cup-for-cup blend, which means that it’s used cup-for-cup when substituting gluten free flour for regular flour in a recipe. Right now, I’m using a lot of Bob’s Red Mill and King Arthur gluten free 1-to-1 flour blends.
You also want to choose a brand that has xanthan gum already in the mix, which will help stop your cake from crumbling. You can add xanthan gum yourself, but it’s much easier to just get it pre-mixed in.
Leavening. I’m using a combination of baking powder and baking soda to help give the cake a nice rise. Gluten free flour has a different blend of starches than regular flour, so we need slightly more leavening than a regular recipe.
Unsalted Butter. This gives the cake a really nice flavor and helps add moisture so the cake isn’t dry. I like to use unsalted butter so I can control the salt level in the recipe.
You can also substitute the butter with vegetable oil. Just add it directly to the dry ingredients with the sugar, vanilla, and egg yolks.
Granulated Sugar. Regular granulated sugar helps give the cake sweetness, and also some moisture.
Creaming the butter and sugar together in the beginning of the recipe helps make sure the sugar is evenly distributed in the cake, and also incorporates some air that helps give the cake a lighter and less dense texture.
Eggs. These act as a binder that helps hold everything together, and also adds a small amount of fat to the cake. For this recipe, you need to separate the egg yolks and the egg whites.
We’re whipping the egg whites and folding them in, to help incorporate more air to give the cake a really fine fluffy texture and velvety crumb. Be very careful not to get any of the yolk in the egg whites, or they won’t whip up properly.
Buttermilk. This is a key ingredient for red velvet! Buttermilk adds a signature flavor, texture, and moisture to the cake.
It has a higher acidity than milk, which works with the baking soda to help everything rise, for a really velvety cake. It also has a more acidic flavor which balances really well against the sweetness of the cake.
You can make your own buttermilk by mixing 1 tablespoon of lemon juice or white vinegar per 1 cup of milk. Let it sit for about 8-10 minutes before adding it to the recipe.
Sour Cream. This adds a lot of moisture and that rich indulgent texture to the cake. Adding sour cream to baked goods is the secret to a really moist cake! Plus at adds to the tangy flavor that balances the sweetness of the cake really well.
Vanilla Extract. This is added for flavor. This recipe uses 2 teaspoons vanilla extract, but you can go up to a tablespoon vanilla extract if you want more vanilla flavor.
Cocoa Powder. Regular unsweetened cocoa powder works well for this recipe. Don’t add too much, because this is just for a hint of flavor.
Salt. A pinch of salt helps balance out the sweetness of the cake, without making it taste salty.
Would you like to save this recipe?
Food Coloring. You can use red liquid food coloring or red gel food coloring. The gel is more concentrated, so you will need less of it. The liquid will need more to get the red color. The more you add, the more vibrant color you’ll get. Don’t go too crazy, because we don’t want the flavor to turn bitter. I used about a tablespoon.
You can make the food coloring optional in this red velvet cake recipe if you’re avoiding it. The cake will taste exactly the same, it just won’t be red. You can also use beets for a more natural alternative (but it won’t be as bright as food coloring).
How to Make Gluten Free Red Velvet Cake
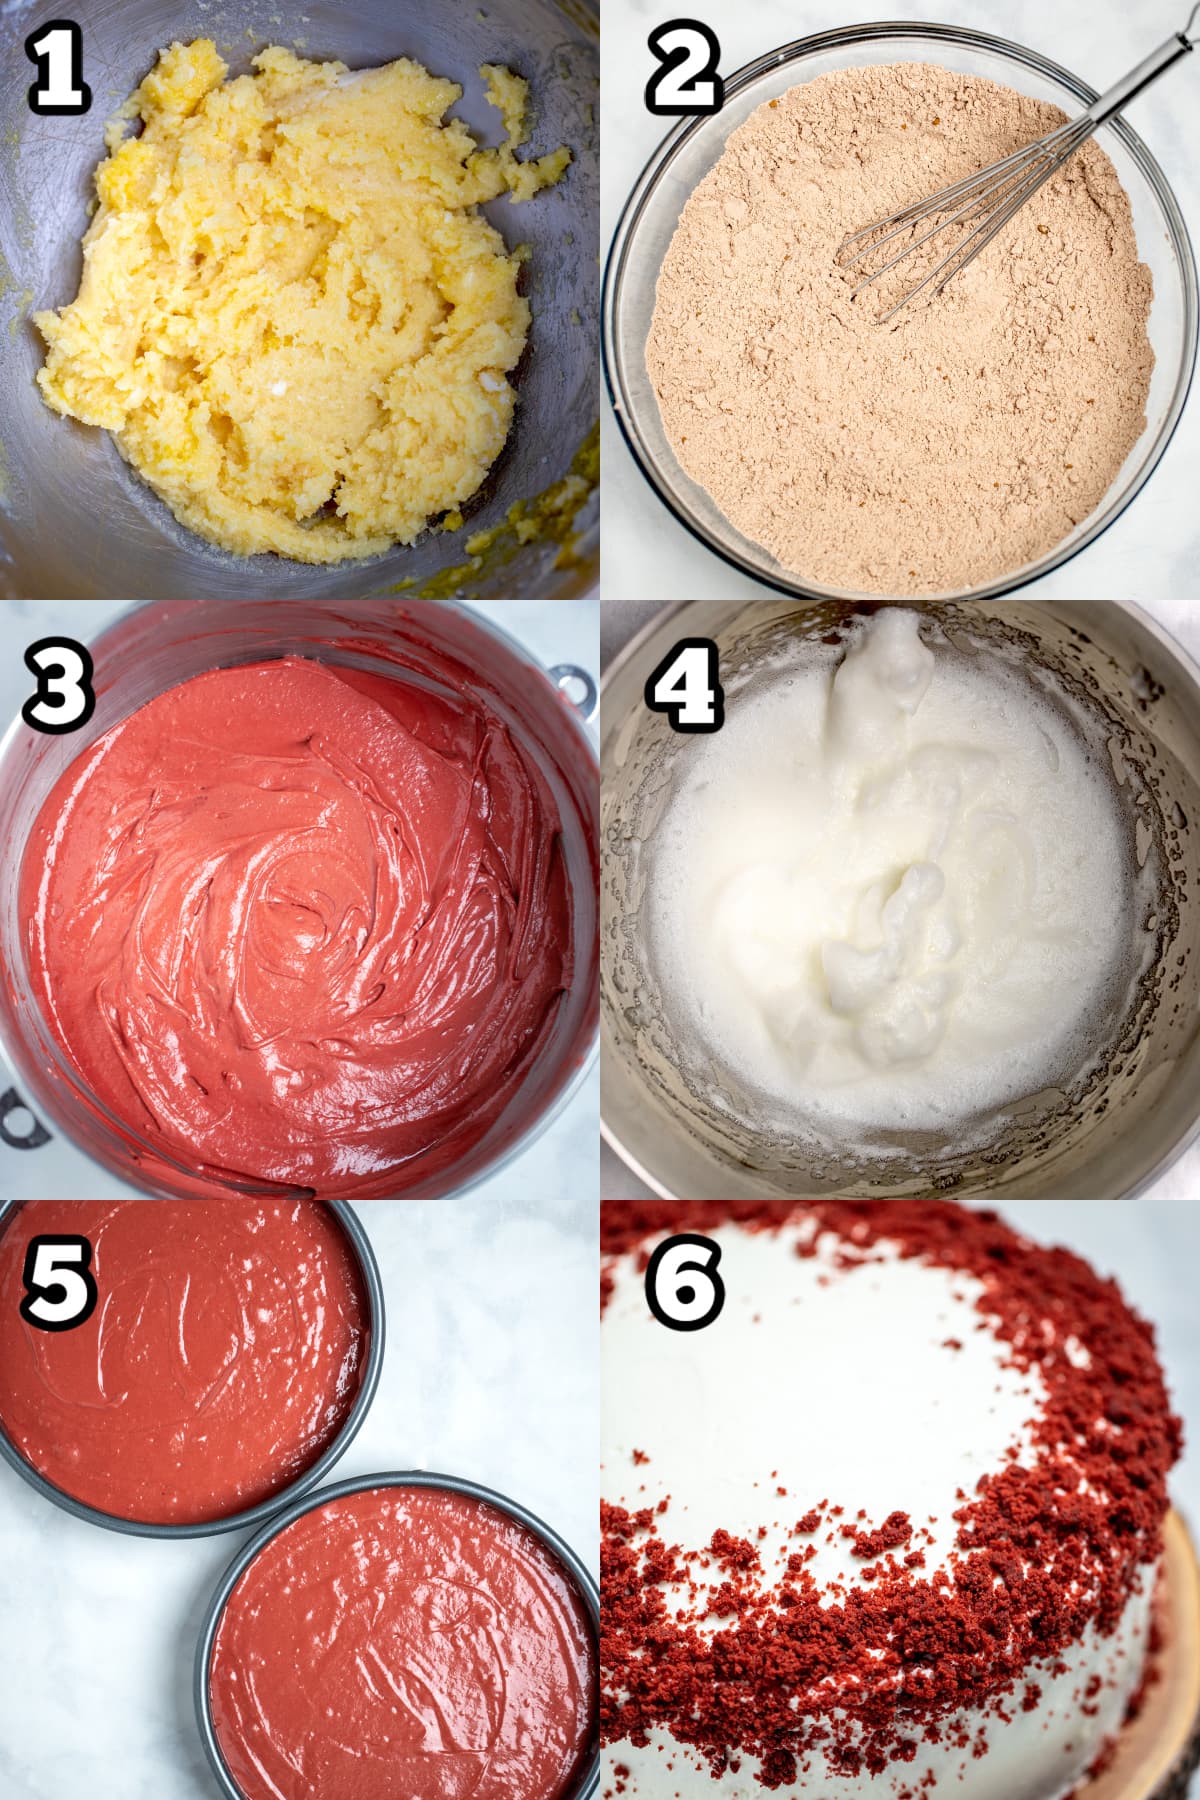
- Preheat the oven to 350°F. Add butter and sugar to a stand mixer and cream together on medium-low speed. While mixing, add the vanilla and the egg yolks one at a time, leaving a few seconds for one to mix in before adding the next one. Mix until well combined. Stop the mixer and scrape the sides and bottom of the bowl to make sure everything is mixed in.
- In a medium mixing bowl, whisk together all of the dry ingredients. Slowly add the dry ingredients to the wet ingredients on medium speed.
- Once all of the dry ingredients are mixed in, add the sour cream and buttermilk. Pour the buttermilk in slowly so it does not splash. While mixing, add the food coloring until the desired color is achieved. Stop the mixer and scrape the sides of the bowl to make sure everything is completely mixed in, and set the mixer to medium speed until you have a smooth cake batter.
- In a separate clean bowl, whisk the egg whites (or use an electric mixer) until they are very foamy but not quite stiff peaks. Use a spatula to gently fold the egg whites into the cake batter until mixed in.
- Grease two 9-inch cake pans with butter, and pour the cake mixture into the prepared cake pans evenly. Bake for 30-35 minutes in the preheated oven, or until the a toothpick comes out clean.
- Let the cakes cool completely before decorating. Placing the pans on a wire rack will help them cool more quickly.
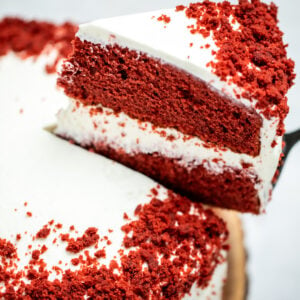
How to Decorate Red Velvet Cake
For a nicer frosting, add a crumb coat first. Layer the cake with frosting between the layers, then coat the top and sides of the cake completely with a thin layer of frosting. Refrigerate the frosted cake for about 30 minutes, then add a second final layer of frosting on top of the crumb coat. This should prevent most of the crumbs from spreading. I don’t worry about this too much with red velvet, because I’m decorating the cake with more cake crumbs, anyway.
- Once the cake is completely cooled, you can begin to layer the cake. Take a small dollop of frosting and place it on your cake plate. Then place a cake layer on the plate (the frosting will help keep the cake from moving while trying to work with it).
- Use a serrated knife to cut a thin layer off of the top of the cake. Set this layer aside in a bowl, later you can crumble this piece and use it to decorate. Removing the top layer helps prevent uneven cake tops, so the next layer will sit nicely.
- Add a generous layer of icing to the top of the cake and spread it evenly. Then place the next cake layer on top.
- Ice the entire cake completely on the sides and top. This is easier if you have an icing spatula. Crumble the layer of cake you removed from the first layer with your hands, then sprinkle the crumbs around the cake decoratively. Store the frosted cake in the refrigerator until serving.
Frequently Asked Questions
This homemade gluten free red velvet cake is tangy, buttery, and sweet with notes of vanilla and a hint of chocolate. The texture is very indulgent, but also very soft like velvet. Typically, you would top this cake with cream cheese frosting for another layer of sweetness. If you don’t like frosting, you can dust the cake with powdered sugar.
Red velvet cake is a mixture of both chocolate and vanilla cake, with some extra added ingredients. There’s not enough cocoa powder in this cake for it to be considered chocolate. We’re only using 2-3 tablespoons at the most. But because there’s chocolate in the cake, it’s not a true vanilla cake, either. Plus the addition of buttermilk gives it a different flavor altogether. Which puts red velvet into a category of its own.
More Gluten Free Cake Recipes
Storage
- Refrigerate leftover cake for 4-5 days. Dairy based frostings must be refrigerated for food safety, and red velvet is typically decorated with a cream cheese frosting.
- Freeze gluten free red velvet cake for 2-3 months, wrapped tightly or stored in an airtight container to prevent freezer burn. Defrost in the refrigerator before serving.
Recipe Variations
- You can get away with only two tablespoons of cocoa powder, or add an additional tablespoon for more chocolate flavor in this red velvet cake recipe.
- Once your cake is completely cooled, you can begin to decorate! I like to use this Whipped Cream Cream Cheese Frosting, because it tastes like cheesecake but it’s much lighter. You can also use a classic cream cheese frosting, or another lighter choice like Mascarpone Frosting.
- Use this same recipe to make gluten free red velvet cupcakes! Pour the batter into a prepared cupcake pan, and reduce the baking time to about 20 minutes. Be careful not to over-bake or the cupcakes will dry out instead of having the moist crumbs we’re going for.
- If you need to make a fun birthday cake, you can use different food colors to change this recipe.
- Instead of cake crumbs, you can decorate the cake with a bit of cocoa powder in a sifter after frosting. You can also frost the cake with buttercream frosting.
Cooking Tips
- Make sure to scrape the bottom of the mixing bowl with a rubber spatula to make sure the cake batter isn’t sticking to the sides or bottom.
- Trace the bottom of the baking pans on parchment paper, cut the circles out, then line the pans bottoms with parchment paper to help prevent the cake from sticking.
- The baking time can vary if you live at a higher elevation. Here’s a really great resource to help you adjust the recipe accordingly. Without the adjustments, you may notice a difference in texture and baking time.
- This recipe makes two layers. If you want more than that, you have to make a double batch, or use smaller cake tins.
- Place your cake on the rack in the center of oven for even cooking.
If you loved this recipe, be sure to leave a 5 Star review below, and tag me with a photo of your finished recipe on Instagram @Jacqui_DishingDelish!
Gluten Free Red Velvet Cake
Equipment
- 1 Stand mixer
- 2 9-inch cake pans
Ingredients
- 1/2 cup butter , unsalted, softened
- 1 1/2 cups white sugar
- 3 large eggs, at room temperature, separated
- 2 teaspoons vanilla extract
- 2 1/2 cups gluten free flour , 1:1
- 3 tablespoons unsweetened cocoa powder
- 2 teaspoons baking powder , double acting
- 1 teaspoon baking soda
- 1/2 teaspoon salt
- 1 cup buttermilk
- 1 cup sour cream
- red food coloring, gel or liquid, until desired color is reached
Whipped Cream Cream Cheese Frosting
- 8 ounces cream cheese, softened
- 1 cup powdered sugar
- 1 teaspoon vanilla extract
- 2 cups heavy whipping cream, cold
Instructions
- Preheat the oven to 350°F. Add butter and sugar to a stand mixer and cream together on medium-low speed.
- While mixing, add the vanilla and the egg yolks one at a time, leaving a few seconds for one to mix in before adding the next one. Mix until well combined. Stop the mixer and scrape the sides and bottom of the bowl to make sure everything is mixed in.
- In a medium bowl, whisk together all of the dry ingredients. Slowly add the dry ingredients to the butter mixture on medium speed.
- Once all of the dry ingredients are mixed in, turn the mixer to medium-low speed add the sour cream and buttermilk. Pour the buttermilk in slowly so it does not splash.
- While mixing, add the food coloring until the desired color is achieved. Stop the mixer and scrape the sides of the bowl to make sure everything is completely mixed in.
- In a separate clean bowl, whisk the egg whites until they are very foamy but not quite stiff peaks. Use a spatula to gently fold the egg whites into the cake batter until mixed in.
- Grease two 9-inch cake pans with butter, and pour the cake mixture into the prepared cake pans evenly. Bake for 30-35 minutes, or until the a toothpick comes out clean. Let the cakes cool completely before decorating.
How to Make Frosting
- Add cream cheese, powdered sugar, and vanilla to the mixing bowl of a stand mixer. Cream everything together on medium-low speed until completely combined. Be careful not to over-mix.
- Once the frosting forms stiff peaks, turn the mixer off. Store the frosting in the refrigerator until ready to use.
Notes
- Refrigerate for 4-5 days. Dairy based frostings must be refrigerated for food safety.
- Freeze for 2-3 months, wrapped tightly or stored in an airtight container to prevent freezer burn. Defrost in the refrigerator before serving.
- Scrape the bottom of the mixing bowl with a rubber spatula to make sure everything is mixed together.
- Trace the bottom of the baking pans on parchment paper, cut the circles out, then line the pans bottoms with parchment paper to help prevent the cake from sticking.
- The baking time can vary if you live at a higher elevation.
- This recipe makes two layers. If you want more than that, you have to make a double batch, or use smaller cake tins.
- Place your cake on the rack in the center of oven for even cooking.
Nutrition
Would you like to save this recipe?
We are a participant in both the RewardStyle and Amazon Services LLC Associates Program, which are affiliate advertising programs designed to provide a means for sites to earn advertising fees by advertising and linking to amazon.com and through RewardStyle.